How to do realtime recording with effect processing on iOS
Introduction
A few years ago, I helped to develop an iPhone app which did some basic DSP processing on the iPhone’s microphone signal. Since then, I have seen a barrage of questions on StackOverflow with people who want to this and are having trouble doing so. The biggest barrier seems to be not the actual DSP processing, but all of the associated framework stuff to get the iPhone to send you a raw PCM data stream.
Apple has some documentation on both subjects, but not really enough to figure out how to put all the pieces together. So without further ado, let’s get started.
WAIT A SECOND – BEFORE YOU READ ANY FURTHER
Yes, this blog post is going to tell you how to do real-time audio processing on iOS, the hard and old-fashioned way. So before we get started with the dirty details, it’s worth asking yourself if you really, really need to do things the hard way.
There is actually an easier way to do all of this, and it’s a framework called novocaine. The framework name says it all; it provides a painless way of doing something otherwise would be very painful. And believe me, doing these low level audio operations on iOS can be quite painful. This framework provides a easy way to do audio processing on iOS, giving the programmer a simple block-based callback which contains the DSP code.
Before you continue reading this article, please, check out novacaine’s GitHub page. If that framework doesn’t meet your needs, then feel free to continue reading and doing things the hard way.
How iOS buffers audio
One of the most difficult tripping blocks for people wanting to program audio for iOS is how it deals with audio buffering. Unlike in the VST world where your code is simply delivered a nice array of floats, you need to tell the iPhone exactly how to pack up the data blocks and send them to you. If you do not tell it this properly, you will get a not helpful error code and be stuck scratching your head.
First, one needs to understand a bit of terminology. A sample is a single point of audio data, sometimes called a sample frame. A group of samples comes together to make a channel, just like the left & right channels of a stereo signal. Finally, a packet contains one or more channels.
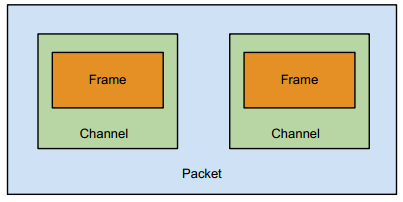
You might be wondering why each channel only contains one frame. I don’t know the answer to that; at least on the iPhone this is simply the way that audio is delivered to you.
AudioUnits on iOS
If you are used to developing AudioUnits on Mac OSX, you might think that AudioUnit development on iOS is going to be basically the same thing. And it is, depending on how you define the word “basically”. The architecture is fundamentally the same, but rather than loading plugins from bundles, you basically do your processing directly in the graph. So if you are trying to port an AU from the Mac to iOS, it’s going to take more work than just hitting recompile.
If you are trying to port a VST/AU algorithm to iOS, hopefully the process() function is well abstracted and written in very vanilla C. If so, then you can easily drop this code into an iOS AudioUnit for processing.
Initializing the audio subsystem
When you are ready to start processing audio, you need to create your AudioUnit and get the system ready to start delivering you sound. That routine looks something like this:
// Yeah, global variables suck, but it's kind of a necessary evil here
AudioUnit *audioUnit = NULL;
float *convertedSampleBuffer = NULL;

int initAudioSession() {
  audioUnit = (AudioUnit*)malloc(sizeof(AudioUnit));

  if(AudioSessionInitialize(NULL, NULL, NULL, NULL) != noErr) {
    return 1;
  }

  if(AudioSessionSetActive(true) != noErr) {
    return 1;
  }

  UInt32 sessionCategory = kAudioSessionCategory_PlayAndRecord;
  if(AudioSessionSetProperty(kAudioSessionProperty_AudioCategory,
     sizeof(UInt32), &sessionCategory) != noErr) {
    return 1;
  }

  Float32 bufferSizeInSec = 0.02f;
  if(AudioSessionSetProperty(kAudioSessionProperty_PreferredHardwareIOBufferDuration,
     sizeof(Float32), &bufferSizeInSec) != noErr) {
    return 1;
  }

  UInt32 overrideCategory = 1;
  if(AudioSessionSetProperty(kAudioSessionProperty_OverrideCategoryDefaultToSpeaker,
     sizeof(UInt32), &overrideCategory) != noErr) {
    return 1;
  }

  // There are many properties you might want to provide callback functions for:
  // kAudioSessionProperty_AudioRouteChange
  // kAudioSessionProperty_OverrideCategoryEnableBluetoothInput
  // etc.

  return 0;
}
Unlike audio on the desktop, you don’t get to tell the system your buffer size. Instead, you can ask the system to provide you with an approximate buffer size. iOS does not guarantee to return the exact buffer size that you’ve asked for, but it will give you something which works for the device and is near what you request. Certain types of DSP applications, such as those using FFT, will greatly benefit from having known buffer sizes during runtime or compile time, but most other audio effect processing shouldn’t matter too much. Unless you need a specific buffer size, you should code flexibly and let the system decide for you.
If you do need a specific buffer size, however, you should create statically-sized structures and proxy buffers to deliver them to the size that iOS determines. This will introduce extra latency, but will improve performance in these cases. And please note, this in a very small number of cases. Most people shouldn’t need to worry about this.
Setting up your streams
Before you can call AudioUnitInitialize(), you need to tell the system what type of streams you expect to have. That code will look something like this:
int initAudioStreams(AudioUnit *audioUnit) {
  UInt32 audioCategory = kAudioSessionCategory_PlayAndRecord;
  if(AudioSessionSetProperty(kAudioSessionProperty_AudioCategory,
     sizeof(UInt32), &audioCategory) != noErr) {
    return 1;
  }

  UInt32 overrideCategory = 1;
  if(AudioSessionSetProperty(kAudioSessionProperty_OverrideCategoryDefaultToSpeaker,
     sizeof(UInt32), &overrideCategory) != noErr) {
    // Less serious error, but you may want to handle it and bail here
  }

  AudioComponentDescription componentDescription;
  componentDescription.componentType = kAudioUnitType_Output;
  componentDescription.componentSubType = kAudioUnitSubType_RemoteIO;
  componentDescription.componentManufacturer = kAudioUnitManufacturer_Apple;
  componentDescription.componentFlags = 0;
  componentDescription.componentFlagsMask = 0;
  AudioComponent component = AudioComponentFindNext(NULL, &componentDescription);
  if(AudioComponentInstanceNew(component, audioUnit) != noErr) {
    return 1;
  }

  UInt32 enable = 1;
  if(AudioUnitSetProperty(*audioUnit, kAudioOutputUnitProperty_EnableIO,
     kAudioUnitScope_Input, 1, &enable, sizeof(UInt32)) != noErr) {
    return 1;
  }

  AURenderCallbackStruct callbackStruct;
  callbackStruct.inputProc = renderCallback; // Render function
  callbackStruct.inputProcRefCon = NULL;
  if(AudioUnitSetProperty(*audioUnit, kAudioUnitProperty_SetRenderCallback,
     kAudioUnitScope_Input, 0, &callbackStruct,
     sizeof(AURenderCallbackStruct)) != noErr) {
    return 1;
  }

  AudioStreamBasicDescription streamDescription;
  // You might want to replace this with a different value, but keep in mind that the
  // iPhone does not support all sample rates. 8kHz, 22kHz, and 44.1kHz should all work.
  streamDescription.mSampleRate = 44100;
  // Yes, I know you probably want floating point samples, but the iPhone isn't going
  // to give you floating point data. You'll need to make the conversion by hand from
  // linear PCM <-> float.
  streamDescription.mFormatID = kAudioFormatLinearPCM;
  // This part is important!
  streamDescription.mFormatFlags = kAudioFormatFlagIsSignedInteger |
    kAudioFormatFlagsNativeEndian |
    kAudioFormatFlagIsPacked;
  // Not sure if the iPhone supports recording >16-bit audio, but I doubt it.
  streamDescription.mBitsPerChannel = 16;
  // 1 sample per frame, will always be 2 as long as 16-bit samples are being used
  streamDescription.mBytesPerFrame = 2;
  // Record in mono. Use 2 for stereo, though I don't think the iPhone does true stereo recording
  streamDescription.mChannelsPerFrame = 1;
  streamDescription.mBytesPerPacket = streamDescription.mBytesPerFrame *
    streamDescription.mChannelsPerFrame;
  // Always should be set to 1
  streamDescription.mFramesPerPacket = 1;
  // Always set to 0, just to be sure
  streamDescription.mReserved = 0;

  // Set up input stream with above properties
  if(AudioUnitSetProperty(*audioUnit, kAudioUnitProperty_StreamFormat,
     kAudioUnitScope_Input, 0, &streamDescription, sizeof(streamDescription)) != noErr) {
    return 1;
  }

  // Ditto for the output stream, which we will be sending the processed audio to
  if(AudioUnitSetProperty(*audioUnit, kAudioUnitProperty_StreamFormat,
     kAudioUnitScope_Output, 1, &streamDescription, sizeof(streamDescription)) != noErr) {
    return 1;
  }

  return 0;
}
It might be tempting to use the kAudioFormatFlagIsFloat flag when setting up your stream. It will even compile on Xcode without any warnings. However, that will not run on an actual iPhone, so you need to construct your app to use linear PCM and convert it to floating point data if necessary. This is one of the “gotchas” that trips up many developers.
Starting audio processing
At this point, everything is ready to go and we can tell the OS to start recording and sending us data.
int startAudioUnit(AudioUnit *audioUnit) {
  if(AudioUnitInitialize(*audioUnit) != noErr) {
    return 1;
  }

  if(AudioOutputUnitStart(*audioUnit) != noErr) {
    return 1;
  }

  return 0;
}
Processing data in the callback
At this point, the system will now call your rendering function whenever it wants audio. Generally speaking, you will want to convert the linear PCM data to floating point, which is much easier to work with. However, in some cases (like an echo plugin), you may not necessarily need to manipulate the samples and can keep the data in linear PCM. The below example demonstrates floating point data conversion, but if you can do everything with integer math, it will of course be more efficient.
OSStatus renderCallback(void *userData, AudioUnitRenderActionFlags *actionFlags,
                        const AudioTimeStamp *audioTimeStamp, UInt32 busNumber,
                        UInt32 numFrames, AudioBufferList *buffers) {
  OSStatus status = AudioUnitRender(*audioUnit, actionFlags, audioTimeStamp,
    1, numFrames, buffers);
  if(status != noErr) {
    return status;
  }

  if(convertedSampleBuffer == NULL) {
    // Lazy initialization of this buffer is necessary because we don't
    // know the frame count until the first callback
    convertedSampleBuffer = (float*)malloc(sizeof(float) * numFrames);
  }

  SInt16 *inputFrames = (SInt16*)(buffers->mBuffers->mData);

  // If your DSP code can use integers, then don't bother converting to
  // floats here, as it just wastes CPU. However, most DSP algorithms rely
  // on floating point, and this is especially true if you are porting a
  // VST/AU to iOS.
  for(int i = 0; i < numFrames; i++) {
    convertedSampleBuffer[i] = (float)inputFrames[i] / 32768f;
  }

  // Now we have floating point sample data from the render callback! We
  // can send it along for further processing, for example:
  // plugin->processReplacing(convertedSampleBuffer, NULL, sampleFrames);

  // Assuming that you have processed in place, we can now write the
  // floating point data back to the input buffer.
  for(int i = 0; i < numFrames; i++) {
    // Note that we multiply by 32767 here, NOT 32768. This is to avoid
    // overflow errors (and thus clipping).
    inputFrames[i] = (SInt16)(convertedSampleBuffer[i] * 32767f);
  }

  return noErr;
}
Keep in mind that this code will be called several times per second. Best
development practices tend to advocate lazy initialization and runtime checks
to keep readability. This is not necessarily a best practice when it comes to
audio development, however. The name of the game here is to move anything you
can out of render and into the initialize function. This includes things like
allocating blocks of memory and calling system functions. In the best case,
your render function will just loop over the input buffer and perform simple
mathematical operations on the samples. Even a single malloc call (or even
worse, an Obj-C [[[ClassName alloc] init] autorelease] allocation) in the
render call is likely to grind your code to a halt or leak memory like crazy.
Same goes with NSLog() or printf(). Those functions should never be called
from within render, except possibly during development. Since Xcode has a
somewhat weak debugger, I’ve noticed that many iOS developers tend to use
NSLog() for debugging, but I would encourage you to instead be clever and
find other ways of fixing problems in your render routine. The reason why is
that calling slow functions from render may cause a condition I jokingly call
“quantum debugging” where code behaves one way in production runs, but
radically different when being observed. This is rather common when trying to
iron out problems in realtime audio code, especially when it comes to dropouts
and distortion which don’t occur in a “clean” environment.
Shutting down
When you are finished processing audio, you need to tell the OS to stop processing and free the AudioUnit’s resources.
int stopProcessingAudio(AudioUnit *audioUnit) {
  if(AudioOutputUnitStop(*audioUnit) != noErr) {
    return 1;
  }

  if(AudioUnitUninitialize(*audioUnit) != noErr) {
    return 1;
  }

  *audioUnit = NULL;
  return 0;
}
Other considerations
As the point of this tutorial was to demonstrate audio buffer construction and realtime audio processing, I glossed over a lot of details. But these are things which you will probably need to take into consideration when developing an application. Before you start processing audio, you should probably:
- Make sure that the device can record audio (this is not possible for the iPod Touch without the headset, for instance).
- Check for possible feedback loops, usually caused when the system’s default input and output are the external mic and speakers. Since the render callback imposes a few milliseconds of latency and the mic and external speaker sit very near to each other on the iPhone, there is a very real possibility of harsh feedback on the device. If you detect a possible feedback loop, you may want to avoid recording or playback (or both, depending on your app’s requirements).
- Install a callback function which will be called when the audio route changes (ie, the user plugs in or disconnects the headset).
- Handle application pausing and switching. If processing is interrupted and you don’t clear the buffers by zeroing them out, you will get nasty noise (aka the “satan saw”).
A word on developing audio on iOS
Unlike Android, iOS development can be mostly done on the desktop without any external hardware. Many developers do their entire application development with the iOS Simulator, which is definitely fine for most day-to-day development tasks. However, if you are writing audio processing apps for iOS, you will most definitely need to develop and deploy them to hardware, and not just during your final testing before submitting them to the app store. I can’t stress that last part enough.
The iOS Simulator uses your Mac’s soundcard and CoreAudio, which is much different than an iPhone or an iPad. Many developers are surprised that simple audio code which works “perfectly fine” in the iOS Simulator will mysteriously fail with the dreaded error -50 on iPhone hardware. Likewise, some things work fine on the hardware but not the simulator. The bottom line is, when you are developing the DSP part of your app, it needs to be done on hardware and preferably tested on every iOS device you intend to support.
That said, iOS is not a very efficient platform for developing DSP algorithms, so you might find it much faster to whip up a quick C++ plugin wrapper using Juce and get it sounding right on a desktop sequencer. Once you are happy with the DSP algorithms, you can take the code (preferably written in very vanilla C) and drop it into the iOS AudioUnit as described above.
Happy coding!