Warping tips in Ableton Live
Introduction
Ableton Live’s warping engine is very powerful, but does not necessarily offer the best results out of the box. Especially in Live 8, the automatic warping feature was much improved, but is still not perfect. Here are some tips to get better results from Live’s warping engine.
Know Your Warp Modes
Live’s manual offers a bit of advice about which warping mode to use for what type of materal (see section 9.3.1), basically it boils down to:
- Beats: Good for simple percussion or drum loops
- Tones: Good for monophonic instruments or vocals
- Texture: Best for atonal or pad sounds
- Re-pitch: Best quality of all, if you don’t mind the pitch being changed
- Complex: Rather useless, because…
- Complex Pro: Best for complex arrangements (ie, entire tracks). Sounds much better than “Complex” and uses modestly more CPU.
Ableton seems to have some hang-ups about Complex Pro using too much CPU, however on any modern machine the difference is barely noticeable (and for this reason they have intentionally excluded it from the default warp mode preference box), however my philosophy is that if Complex sounds good, Complex Pro will almost always sound better.
However, don’t take my word for it. If you are really debating which warp mode works for a piece, do the following:
- Duplicate the track you’re working on
- Set the duplicate to the other warp mode you are considering
- Map a keystroke to enable/disable both the first and second track
- Disable one of the two tracks, so that the key will switch between them
- Close your eyes (seriously)
- Press the key a bunch of times rapidly (again, seriously)
- Now, with your eyes still closed, press the key and listen carefully
- Which sounds better? Open your eyes
- Repeat a few times
The closing your eyes bit is indeed serious advice, don’t just look away from the screen. Closing your eyes will shift your brain’s focus from hearing and vision to just hearing. Usually I can hear 9/10 the difference between Complex and Complex Pro, so I pick Pro. If I can’t tell the difference, then I pick the one which uses less CPU.
Disable Create Analysis Files
I highly recommend going to Live’s preferences and disabling “Create Analysis Files” (under the File/Folder section), which is enabled by default. The rationale here is that one wants to be absolutely sure that when you drag a track into Live, it has been warped to your standards and will mix will.
This means that you need to click “Save” on each warped track to manually save the corresponding ASD file, however it means that when you have a large library of tracks which ones can be safely dropped into a liveset during your performance without having to worry about the sound.
Warping Dance Music
When I want to warp a new dance track (ie, something composed on a computer), I do the following:
- Turn on the metronome
- Find the first kick drum, make a transient there by double-clicking if there isn’t already a transient in place.
- Shift-click on the transient and drag it carefully into place. The more exact, the better. Rather than placing transients before the kick, I tend to place them at the peak, as this sounds better when mixing.
- Right-click on the transient and click “warp from here”
At this point, three outcomes can occur. Sometimes, Live get everything right, which is made clear by skipping through the rest of the track and noting that the metronome is tightly aligned with the audio. If this is the case, skip to “Finishing the warp”. The second outcome is that Live got it mostly right, which is usually the case if there are no transients at all or the metronome is just slightly off throughout the track. In this case:
- Set transients on the first beat after a breakdown
- Right-click on post-breakdown transients, and warp from here
- Set a transient on a clear beat towards the end of the track
Usually this will result in tight sync throughout the track. The third possible outcome is that Live is way off, which is easily identified by either a wild metronome or more warp transients than can be counted on one’s fingers and toes. In this case:
- Delete all transients after the first one (at 1.1.1 which was placed manually)
- Turn off warping for the track and tap the tempo
- When you’ve found the tempo for the track, right click on the 1.1.1 marker and select warp from here. If this doesn’t result in a tight sync, see the “Warping Rock Music” section.
Warping Vinyl Rips
If you’ve converted your vinyl collection to digital, then it’s important to compensate for any subtle tempo drifts caused by the natural periodic motion of a turntable. In these cases I usually prefer to set the first warp marker, and then “Warp XXX BPM from here”. Follow the entire track, stopping to readjust and re-warp from here when necessary.
Warping Rock Music
Actually this section applies to any music played by a real band, and not a computer-driven drum machine. In these cases, it is more important not to let Live automatically warp the track, as overcorrecting for natural tempo drift will suck much of the energy out of the music. In such cases, I usually do the following:
- Find 1.1.1, set a transient there
- Disable warping, tap the tempo
- Turn on warping again
- Right click on 1.1.1, select “Warp from here (Straight)”
- Go through the track, placing a transient on every bar. Do not place any other transients in the track.
Sometimes instead of every bar, a transient can be placed every X bars, where X is a number that just “feels right” given the consistency of the tempo for the track in question. Warping in this manner takes more time, but you’ll preserve the “human” elements of the track while still keeping a tight tempo, allowing you to mix the track with dance music.
Warping Long Intros
In the case of a long intro, find the first actual kick drum and place 1.1.1 there. Warp the rest of the track first and forget about the intro. Then, place a transient at the very beginning on the track where the music actually begins. Right-click and set that as 1.1.1 and move the starting arrow marker there.
Now, delete all warp markers between that point and the other transient for the first kick. They are likely to be wrong anyways. If the intro is off, place just one or two transients to correct it, not many will be needed.
Warping Tempo Changes
Usually it’s a bad idea to correct momentary tempo changes, such as when a song picks up tempo during a breakdown or drops through the floor. If the artist is crazy enough to have written them into the song, it’s likely that the song will sound terrible if you iron them out. Instead, just place a single transient at the very end of the “normal” part, and another one on the first beat when the tempo goes back to normal.
You’ll need to make sure that the second transient corresponds to the first beat in a bar (the downswing beat), or else the track will be all screwed up when the tempo comes back to normal. In these cases it is likely that the next even bar is some distance away; simply drag the closest bar over and use that point. The tempo change breakdown is already going to sound crazy, so this won’t be so noticable.
Now, delete all transients between those two points, and set a “!” as the track type so you’ll remember not to attempt mixing during the tempo change.
If a song has a permanent tempo change, then it will likely sound ok if it is ironed out. In this case, keep creating transients and “warp from here” until you flatten the correct tempo out.
When not to Warp
There are some cases when a song is just too difficult to nail into place for whatever reason. If you still want to play it, sometimes it’s best not to warp it, and to mix it in another manner.
For such tracks, I still make sure to set the starting point correctly, and mark the track with a “!” so I know that the tempo is odd. Mixing into such tracks is not terribly difficult, one good technique for this is to take the previous track apply a highpass filter and reverb over the course of several bars. When one only hears the ambience of the reverb, bring in the next track. Here’s an example of mixing a warped track with an unwarped one.
Finishing the Warp
After a piece has been warped, I like to set a nice clip name for it in the form of “(Type)Artist: Track”. I use the following characters to designate the clip type:
- (No character): A normal track, will start at the beginning and play until the end.
- !: This track is unwarped or does evil things like tempo changes. Use caution when playing.
- >: This clip is an intro loop
- <: This track has a loop point at the end
Setting a name has two purposes. First, it’s much easier to identify tracks based on a consistent naming scheme rather than filenames (especially those annoying “01 Trackname.m4a” ones generated by iTunes). Second, it allows you to quickly identify unwarped tracks when dragging them into a set – if it doesn’t have your naming convention, then it can’t be trusted. This is especially important when your track library is extremely large.
Next, skip the track to the body and set the clip volume so that it gently bounces around the 0.0dB point. Make sure you have disabled any limiters or other effects on this track before calculating volume. Some warp modes, namely Complex Pro, will add a few decibels of volume to the track and one must compensate for this in order to make sure that the volume levels of all warped tracks are consistent.
Also for some reason Live’s colorschemes always use a single color for text, regardless of whether or not the text sits on a light or dark background. If the randomly assigned color for the clip is unreadable, pick another one.
Don’t forget to hit “save” under the clip properties!
Use Beats As A Gate Effect
The transient artifacts in the Beats warp mode can do some cool stuff as an unintended effect, especially with non-percussive material. For example, it can act as a strange gate when set to “off” with an envelope length of 0:
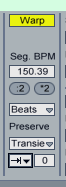
You’ll also need to play around with the “Preserve” value make sure that some audio is still produced at regular intervals.